I have created a new wizard by extending the MBSCustomPage class, I was wondering how can I execute some codes when finish button has been pressed,
I have implemented the Runnable and I had written the codes in run method,
This was not adequate for going to run method after pressing finish,
I had to add my class to operationClass in MANIFEST as well.
Here is the code which is needed.
public class NewProjectWizardPage extends MBSCustomPage implements Runnable{
/**
*This is called when the finish button of the new Project Wizard has been pressed
*/
public void run(){
}
Tuesday, June 29, 2010
How to change a Standard Project to a Make Project in Plugin
Here is the code for changing the Standard Project to Make Project in CDT plugin.
IProject project = ResourcesPlugin.getWorkspace().getRoot().getProject("projectName");
IConfiguration activeConfig = ManagedBuildManager.getBuildInfo(project).getDefaultConfiguration();
activeConfig.setManagedBuildOn(false); // or true
ManagedBuildManager.saveBuildInfo(project, true);
IProject project = ResourcesPlugin.getWorkspace().getRoot().getProject("projectName");
IConfiguration activeConfig = ManagedBuildManager.getBuildInfo(project).getDefaultConfiguration();
activeConfig.setManagedBuildOn(false); // or true
ManagedBuildManager.saveBuildInfo(project, true);
Monday, June 28, 2010
Installing Eclispe SDK And CDT
You can download the Eclipse SDK 3.5.2 from here,
http://download.eclipse.org/eclipse/downloads/drops/R-3.5.2-201002111343/index.php
After downloading the eclipse extend the file into for example c:\ , so you would find an eclipse.exe file in eclipse folder, run eclipse.exe.
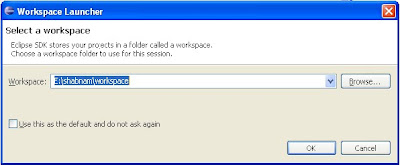
Choose your WorkSpace,
We are going to extend some of the CDT extensions so we have to install CDT plugin into our eclipse.
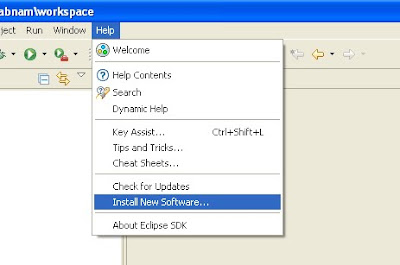
In order to add CDT Plugin go to Help, Install New Software.
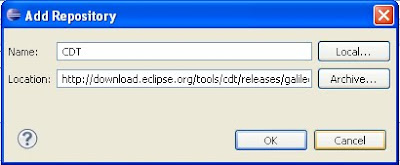
Click Add and write http://download.eclipse.org/tools/cdt/releases/galileo in location and choose a name for CDT plugin (e.g CDT), click Ok Eclispe starts to download the CDT.
Debugging with GDB and OpenOCD By Using Wiggler Jtag
I have found OpenOCD the best solution for debugging the embedded hardware by using Jtag devices.
Open On-Chip Debugger has been created by Dominic Rath as part of a diploma thesis at the University of Applied Sciences, FH-Augsburg.
Since that time, the project has grown into an active open-source project, supported by a diverse community of software and hardware developers from around the world.
The Open On-Chip Debugger (OpenOCD) aims to provide debugging, in-system programming and boundary-scan testing for embedded target devices.
Download OpenOCD 0.4.0 from:
http://www.freddiechopin.info/index.php/en/download/category/4-openocd
Or you can download the openOCD project from here:
http://developer.berlios.de/projects/openocd
and build it yourself.
OpenOCD User's Guide,
http://openocd.berlios.de/doc/pdf/openocd.pdf
I am using wiggler Jtag to debug a sample application.
Wiggler Jtag Schematic:
Using OpenOCD is not as easy as just connecting your Jtag and running OpenOCD.
You have to configure OpenOCD server so it knows about the Jtag and the hardware.
I have installed the OpenOCD in C:\Program Files\OpenOCD\0.4.0\bin
OpenOCD would read it's configuration from openocd.cfg by default.
Here is my openocd.cfg for using Wiggler Jtag and AT91EB40a evaluation board.
source [find board/AT91EB40a.cfg]
source [find interface/parport.cfg]
interface parport
parport_port 0x378
parport_cable wiggler
There are some pre-configured files for some evaluation boards, processors and connections, for example here I am using AT91EB40a evaluation board so I include the
board/AT91EB40a.cfg file at the top of openocd.cfg file.
These are the default port addresses for OpenOCD,
gdb_port 3333
telnet_port 4444
So you can connect to OpenOCD by telnet in port 4444 and use telnet as a console for it.
Let's debug our application,
1. Connect your wiggler to the AT91EB40a evaluation board.
2. Power on the board
3. Run OpenOCD
4.Run gdb from Eclipse
Follow the instruction in post "Embedded Remote Debugging With Eclipse"
But in command write target remote localhost:3333 to connect to OpenOCD and run Debug.
Embedded Remote Debugging With Eclipse
We have installed the requirement components in "Complete C/C++ Embedded Development Environment For ARM"
It's time to debug our application on an embedded hardware.
In this way we can debug our application on the selected hardware which is connected to the PC via serial port or Ethernet.
Open Eclipse, write click on the selected project,select Debug As, Debug configuration,
Write click on Zylin Embedded debug(Native) and make a new configuration.
Open the Debugger tab and choose arm-eabi-gdb as your GDB debugger, as we are debugging in eCos.
Go to command tab and write the following for command
target remote /dev/ttyS0 (according to your serial address, this would select com1)
load (your project path)
If the hardware is connected to the PC via Ethernet, target remote command would be,
target remote localhost:port number
Click Apply and Debug.
Compiling for Debugging in gdb
In order to debug a program effectively, you need to generate debugging information when you compile it. This debugging information is stored in the object file;
It describes the data type of each variable or function and the correspondence between source line numbers and addresses in the executable code.
To request debugging information, specify the ‘-g’ option when you run the compiler.
It describes the data type of each variable or function and the correspondence between source line numbers and addresses in the executable code.
To request debugging information, specify the ‘-g’ option when you run the compiler.
Complete C/C++ Embedded Development Environment For ARM
I am going to make a development environment included IDE and debugger in windows for ARM in eCos platform.
For a complete environment we need the following components:
1.Cygwin (I am using ver 1.7)
2.eCos (I am using ver 3.0) and GNU ARM Toolchain
3.Java Runtime Environment(JRE)
4.Eclipse IDE for C/C++ Developers(I am using Helios ver 3.6.0)
5.Zylin CDT Plugin
You can follow the "Installing eCos 3.0 For Windows" post for installing Cygwin and eCos.
Let's go to step 3:
First we will check if the JRE is already installed on your PC. Therefore open a command prompt and type:
C:\>java -version
If the Java Runtime Environment (JRE) is not installed on your PC, you can download the JRE from the following Sun website:
http://java.sun.com/javase/downloads/index.jsp (about 16 MB)
At this time you can find "JRE ver 6 update 20"
Download and save the source to c:/temp
(Note: The Zylin plugin does not work with java 1.4.2)
STEP 4:
You can download Eclipse IDE for C/C++ Developers (87Mb) from the following link:
http://eclipse.org/downloads/packages/
Download and save the "Eclipse IDE for C/C++ Developers" in c:\temp folder.
Let's go to temp folder and start installing JRE if you haven't installed it before.
After installing the JRE unzip the Eclipse IDE for example in C:\
so you would have C:\eclipse and the exe file of eclipse would be in eclipse folder.
STEP 5:
Click on eclipse.exe file in eclipse folder,
Choose your workspace folder,
Go to help install new software to install Zylin plugin.
The following page would appear,Press Add,
Choose a name for your plugin (e.g Zylin),and add http://opensource.zylin.com/zylincdt path to the location,
Press Ok,
It would ask to restart, press Yes,
Now you have installed Cygwin,eCos,GNU ARM Toolchain, Eclipse with CDT and Zylin plugin.

Installing eCos 3.0 For Windows
Starting to make the environment for eCos installation and making
GNU toolchain for eCos.
I have followed the instruction given by eCos website.
http://ecos.sourceware.org/getstart.html
http://ecos.sourceware.org/build-toolchain.html
I have installed cygwin ver 1.7.
You can also use "cygcheck -srv" to get detailed information about cygwin
I did the following :
1.Re-installed cygwin ver 1.7 with eCos recommended packages
2.Installed ecos according to the instruction in ecos website
3.Getting the Configtool for windows from the link below:
http://www.ecoscentric.com/devzone/configtool.shtml
Which Application Is Using Which Port
Run the Windows Task Manager,
Go to Process tab and go to view and ckeck the PID so you would see the running application PID in Windows Task Manager.
In command line run "netstat -ano" so you would see which port is using by application by looking for it's PID.
Go to Process tab and go to view and ckeck the PID so you would see the running application PID in Windows Task Manager.
In command line run "netstat -ano" so you would see which port is using by application by looking for it's PID.
Monday, May 17, 2010
Tortoise Svn
TortoiseSVN is a free open-source client for the Subversion version control system.
That is, TortoiseSVN manages files and directories over time. Files are stored in a central repository. The repository is much like an ordinary file server, except that it remembers every change ever made to your files and directories.
This allows you to recover older versions of your files and examine the history of how and when your data changed, and who changed it. This is why many people think of Subversion and version control systems in general as a sort of “time machine”.
The Lock-Modify-Unlock Solution
Many version control systems use a lock-modify-unlock model to address this problem, which is a very simple solution. In such a system, the repository allows only one person to change a file at a time. First Harry must lock the file before he can begin making changes to it. Locking a file is a lot like borrowing
a book from the library; if Harry has locked a file, then Sally cannot make any changes to it. If she tries to lock the file, the repository will deny the request. All she can do is read the file, and wait for Harry to finish his changes and release his lock. After Harry unlocks the file, his turn is over, and now Sally
can take her turn by locking and editing.
TortoiseMerge
TortoiseMerge is a tool for easily apply patches.
TortoiseMerge helps you with both those tasks:
• Reviewing patches
• Applying the patches
If you're working with a version control system (e.g. Subversion) then you sometimes get conflicts when you update your working copy. This happens if someone else changed the same parts of the file you're currently working on as you did. Then you have to resolve those conflicts manually. This is where TortoiseMerge can help you.
TortoiseMerge has several different uses:
• Viewing the difference between two files and merging changes into one of them, or removing unwanted
changes.
• Editing conflicts between local changes and changes in the Subversion repository following an update.
• Applying patch files. This is the reason TortoiseMerge was created :)
Subscribe to:
Posts (Atom)